I took my latest cosplay idea from the latest Hobbit movies and have enjoyed every second of it. I mean, who doesn't like the idea of a battle hungry, axe-wielding, beer-guzzling BALD dwarf? (No show of hands, please. I won't acknowledge you with all of your negativity.)
Dwalin is a pretty cool looking cat, in my opinion and with my natural baldness, it was a no-brainer for a cosplay choice. The process has been a bit trying due to money, time and design issues but I finally made some headway when I discovered cold porcelain thanks to a good friend. Cold porcelain is a non-toxic, homemade modeling clay of sorts that air dries reasonably quick, accepts paints, sanding, clear coats, etc. and is super easy to work with. I initially started making the accessories out of the porcelain and then deviated to particle board. Particle board is basically fine wood chips pressed together and used for inexpensive furniture, for example. Besides the price tag, I did find that the cold porcelain did not sand down very good with the Dremel sand paper wheel. Either method is cheap, however, if you live in an apartment complex like I do and aren't afraid to root through the designated "used furniture deposit area", there is plenty of used wood to be found. I purchased the cheapest Dremel that I could find (around $29 at Walmart) and started carving. Note: I also have a hand-me-down jigsaw that I use to cut out basic shapes and then I refine with the Dremel.
Dwalin's axes are called Grasper and Keeper or Ukhlat and Umraz in Khuzdul. I am recreating these myself since a production pair from molds from the movie production company cost between $299 and $500. Yeah, not going to happen. I struggled in the beginning because I really had nothing at my house to use for these. I watched countless videos, read articles and did research.
Ax Template

My first ax head was made from a piece of stiff garden foam. I bought a sheet of it at Walmart, drew a template, cut the shape out of the foam and then sanded the ax head to the shape that I needed. Then, the dreaded mistake of the entire process. I sprayed clear coat on it. What was I thinking exactly? Who knows? Anyway, when I went out to my porch to see if the ax was dry, it wasn't there. Where the ax had been there was now a puddle of green goo. Cool! I'm inquisitive so I went over and poked the puddle and found it to be rock hard and practically cemented to the concrete deck of the porch. Clean up is never fun especially after a failure.
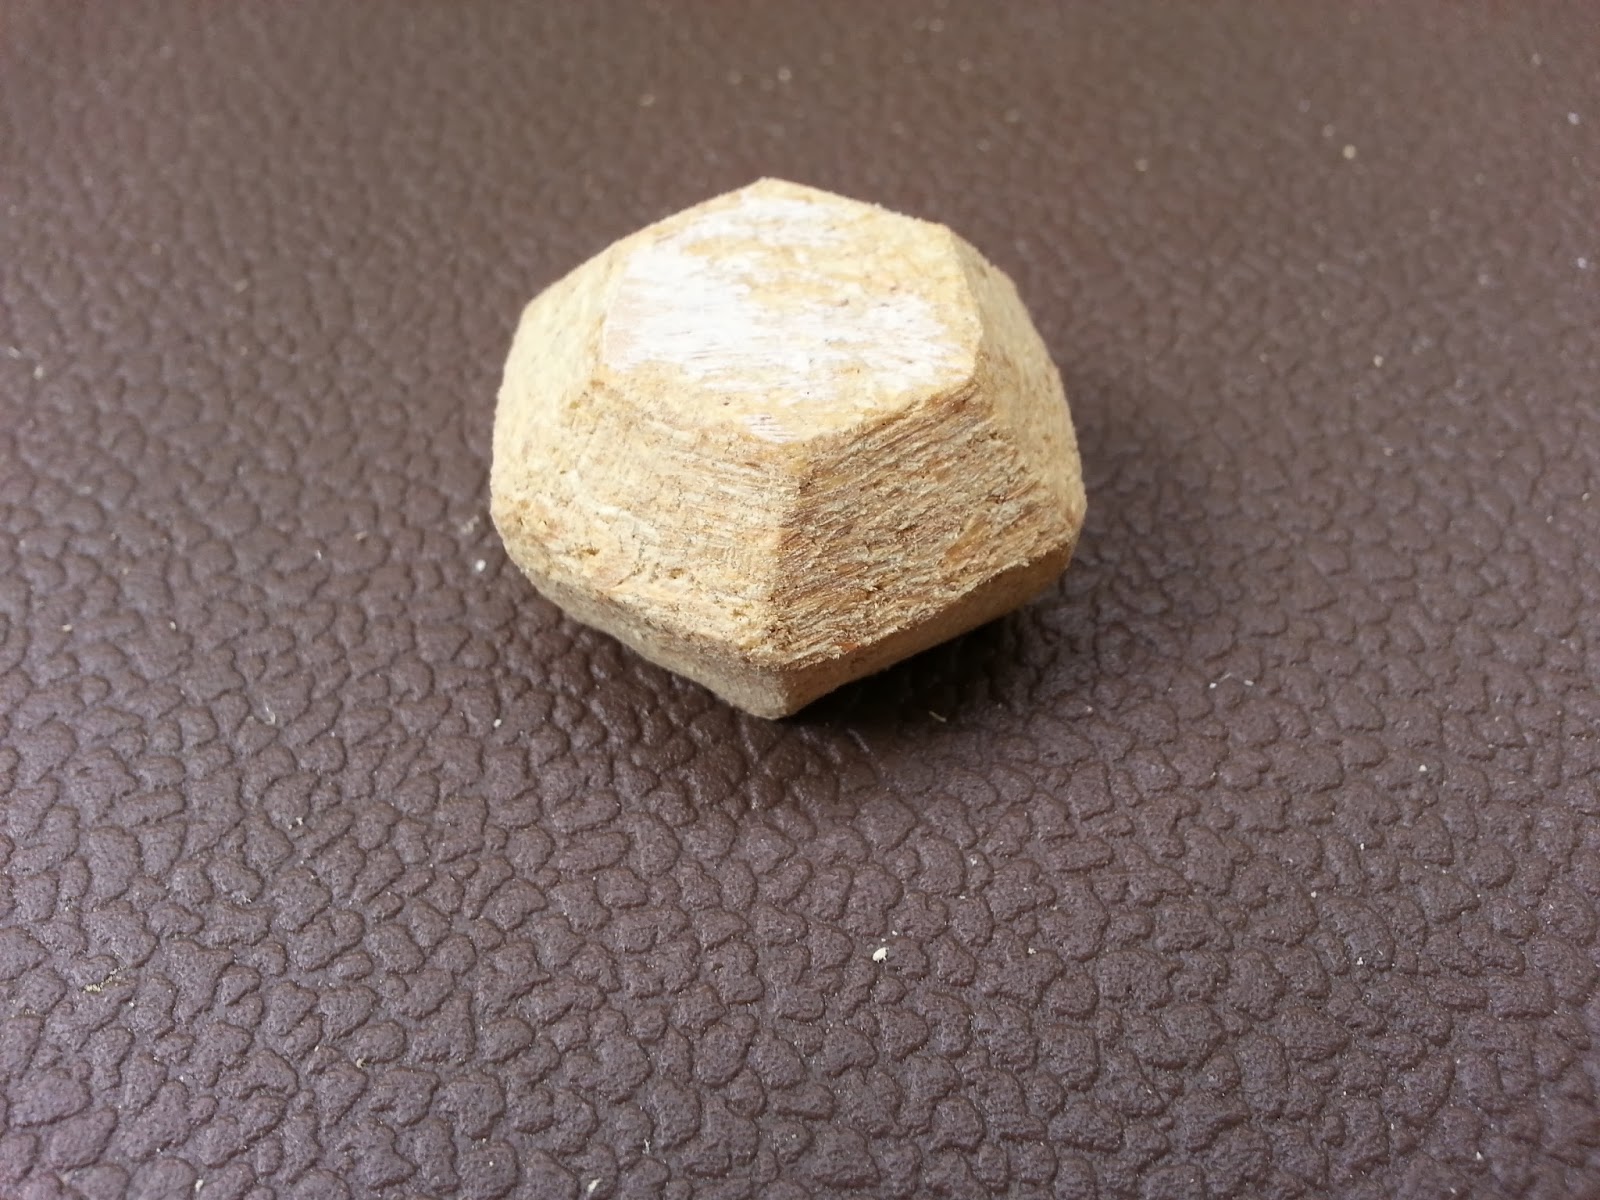
Almost a good idea

So, with the head of the axes turning into a dilemma, I turned to the ax hafts. I went the easy route and bought some cheap 7/8" dowels in the craft section of Walmart. I also bought some cheap leather scraps from a local leather store (Tandy Leather.) With those pieces purchased, I created the rough pommels from the particle board. This part is where the Dremel came in very handy.
Ax Pommels


Finished pommels and the beginning of the leather harness chest piece

My wife finally suggested that I use one of the spare shelves that we had in the house for the ax heads. They are made of particle board and cut pretty easy with a jigsaw. Needless to say, once she suggested that, I didn't stop until I had two functional ax heads. Now the dilemma was how to attach the haft to the ax head. There is a larger cylindrical section of the ax that the haft and the ax head slide into. As limited as I was with tools, I mulled the design for awhile. I finally asked a craftsman friend at my work and he gave me a great suggestion. A quick side note: utilize your resources!! Ask questions from multiple people. We live on a rock flying through space where up and down is not relevant and there are billions of people. Someone out there has an idea for you.
The transition of shelf to weapon head


Ax head painted with Hammered Metal spray paint, engraved dwarven runes colored black.

With the axes out of the way for the moment, I needed an outfit. My wife wanted a sewing machine so I purchased one (again, Walmart.) With the Singer in her hands, this woman is a maestro. Within a couple days I had fur-topped boots, pants, under shirt, tunic and fur throw for my shoulders. Beast!
Then, she bought a bald cap put it over my head and then drew some guide lines for the fake hair we would be applying. We bought some crepe wool which is used by many to produce fake hair, beards, etc. She wet it during the night and let it hang dry over night which stretched it a bit and made it more receiving to a comb. She ended up buying a cheap wig just in case the crepe wool didn't come out right. Although I was happy with the first version, her second version was easier to work with and looks a bit better.
In my next entry, I will show the hair, the separate pieces of the outfit and the continuing saga of the axes, Grasper and Keeper.
I'm impressed. I love cosplay and can't wait to see the finished outfit!
ReplyDelete